React Native + Firebase Part 2: How to Manage Push Notifications During The App Lifecycle on iOS & Android


Helena Ford / December 30, 2019
8 min read

In part 2, we’re going to go into detail about how we manage the notifications for every app state and understanding the different notification types.
If you haven’t completed Part 1 or haven’t integrated firebase 🔥 notifications with React Native, take a look 👀 at that first and come back.
App Lifecycle
It’s important to make sure the push notifications 📲 are managed during every state of the app lifecycle. There are 5 in total:
- Not running 🚶♀️ – The app is not running. The app is not in memory at all due to being involuntarily terminated, either because the system required resources for a foreground app, or the user force-quitted the app.
- Suspended – The app is in the background, but no code is being executed.
- Background 🎑 – The app is running in the background, and executing code.
- Inactive – The app is running in the foreground, but not receiving events. An iOS app can be placed into an inactive state, for example, when a call or SMS message is received.
- Active 🏃♀️ – The app is running in the foreground, and receiving events.
To simplify it, we can group the following:
- Foreground: active
- Background: inactive & background & suspended
- Not running
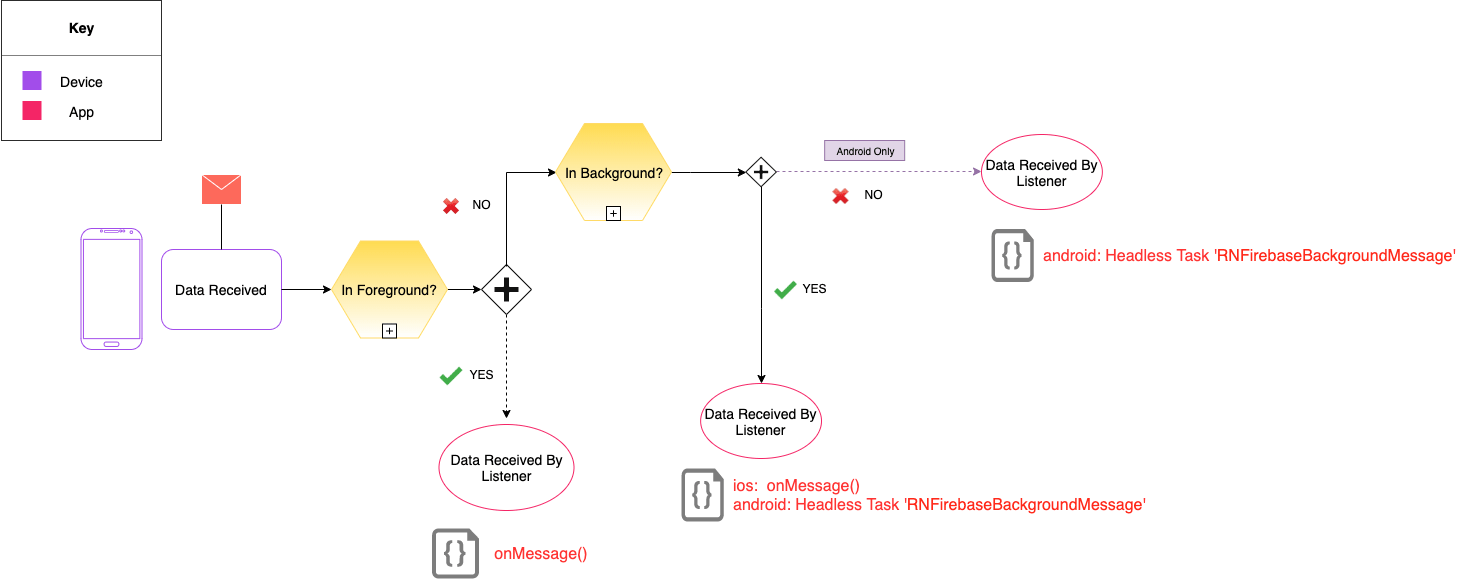
So we are left with three states for us to manage. When a notification is received, we need to understand what happens for each state and what part of our application logic is called.
To describe the process, see the following diagrams:

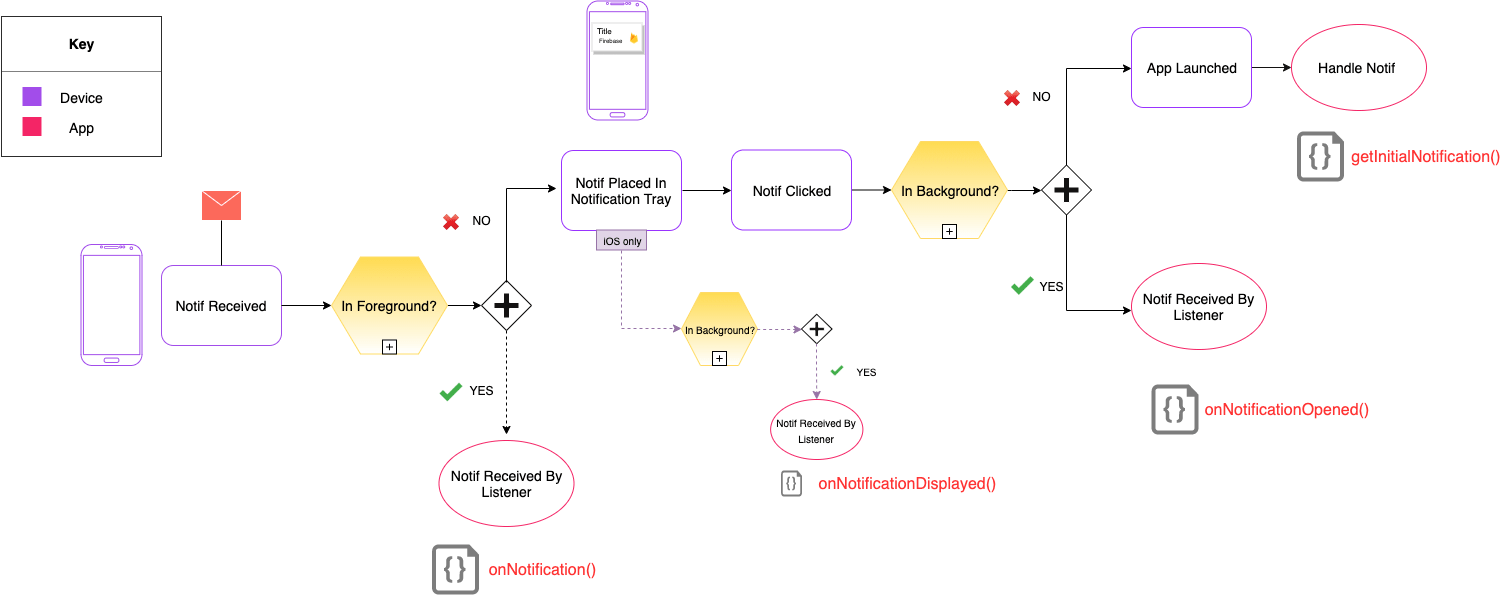

The main parts 🍰 to note are the RNFirebase listeners 👂 that our app will need to implement:
- onNotification
- onNotificationDisplayed
- onNotificationOpened
- getInitialNotification
- onMessage
Message Types ✉️
Below are the different types of messages you can send. Each one determines how they are handled on the client. See here for more information from the official Firebase Documentation.
| Type | Behavior | How to send |
|---|---|---|
| Data (aka silent notifications) | Your app is responsible for processing data messages. | Send only the data key. |
| Notification | Automatically displayed on the device. | Send only the notification key. |
| Both (Notification & Data) | Varies based on whether the app is in background or foreground: |
Background: notification displayed automatically and the data payload is handled only when the user taps the notification.
Foreground: both payloads are available. | Send both keys (notification & data). |
Requirements
Size Limit: Payload must be under 4KB.
Payload: Composed of common fields and platform-specific fields. Any fields that are platform-specific override the common ones.
More info on the payload including a full list of fields is here.
{
  "name": string,
  "data": {
    string: string,
    ...
  },
  "notification": {
   "title": string,
   "body": string,
   "image": string
  },
  "android": {
    object (AndroidConfig)
  },
  "webpush": {
    object (WebpushConfig)
  },
  "apns": {
    object (ApnsConfig)
  },
  "fcm_options": {
    object (FcmOptions)
  },
The Code 👩💻
Let’s clean up this code a little and move it out of App.js so it’s more manageable and easier to maintain.
As we’re using React Native 6, I leveraged hooks to extract the firebase 🔥 code into its own service 🚒 “useNotificationService”.
The following snippets are the skeleton code to implement everything you need to work with the RNFirebase library 📚 and receive notifications 👊.
Notes
App.js (snippet/full): In my case, I implemented the hook in appNavigator.js. This is so I can access my navigation system. It’s dependent on what setup you have, but you should register as early as possible, as close to the top of the stack you can. If your version of React Native doesn’t support hooks (or you prefer not to use them), you can either keep your code in App.js or use an empty component.
useNotificationService (snippet/full): Hooks is still fairly a new technique, and I had fun seeing what can be done with it. I do really like the new feature, it does make the code a lot simpler and easier to understand. I did come across an edge case (https://github.com/facebook/react/issues/15865), where I want the effect to run once when the component mounts, regardless of dependencies.
fcm.js (snippet/full): This is our interface that implements RNFirebase’s methods. There may be some functions you don’t need depending on your use case. For example, you might not need ‘scheduleLocalNotification’ because you only work with remote ones or ‘removeDeliveredNotifications’ e.t.c.
Observations
Some differences to note with Android 🤖 & iOS 🍎:
- Android allows the ability for headless tasks to run when the app is in the background. RNFirebase allows us to leverage this ability to listen to incoming silent notifications (‘RNFirebaseBackgroundMessage’). Only silent notifications with priority set to high will be received.
- For iOS, it is unsupported to send remote silent notifications when the user has force-quit the app (see here).
- content_available important when using silent 🤫 notification for iOS. It determines if the app is woken up when a background notification is received. But silent ones aren’t guaranteed to be delivered. This makes testing hard but if it’s important to your app for this feature, make sure you set it! Also, what’s confusing is content_available for firebase actually maps to APNs content-available so just make sure you get it the right way round. And, another thing to note is when this is set to true “the message is sent through APNs, otherwise it is sent through the FCM ☁️ connection server.”
You don’t have to worry about this too much as the RNFirebase library takes care of it, but if you run into problems it’s good to be aware of it.


- For iOS, you can call getDeliveredNotifications which returns an array of all notifications that are in Notification Center. But for Android it’s a little bit more difficult. There’s something called a StatusBarNotification and a method getActiveNotifications. I had to add both methods to the RNFirebase library, but basically you don’t get as much information from Android (no data attribute and no ID) as you do with iOS.
- Following on from the missing information for Android, for testing purposes I set the tag as the ID. I wasn’t using the tag attribute for anything else, and the ID can now be retrieved 🙂 win-win.
- For Android, the following configuration was needed for scheduled local notifications in the background.
Postman Collection

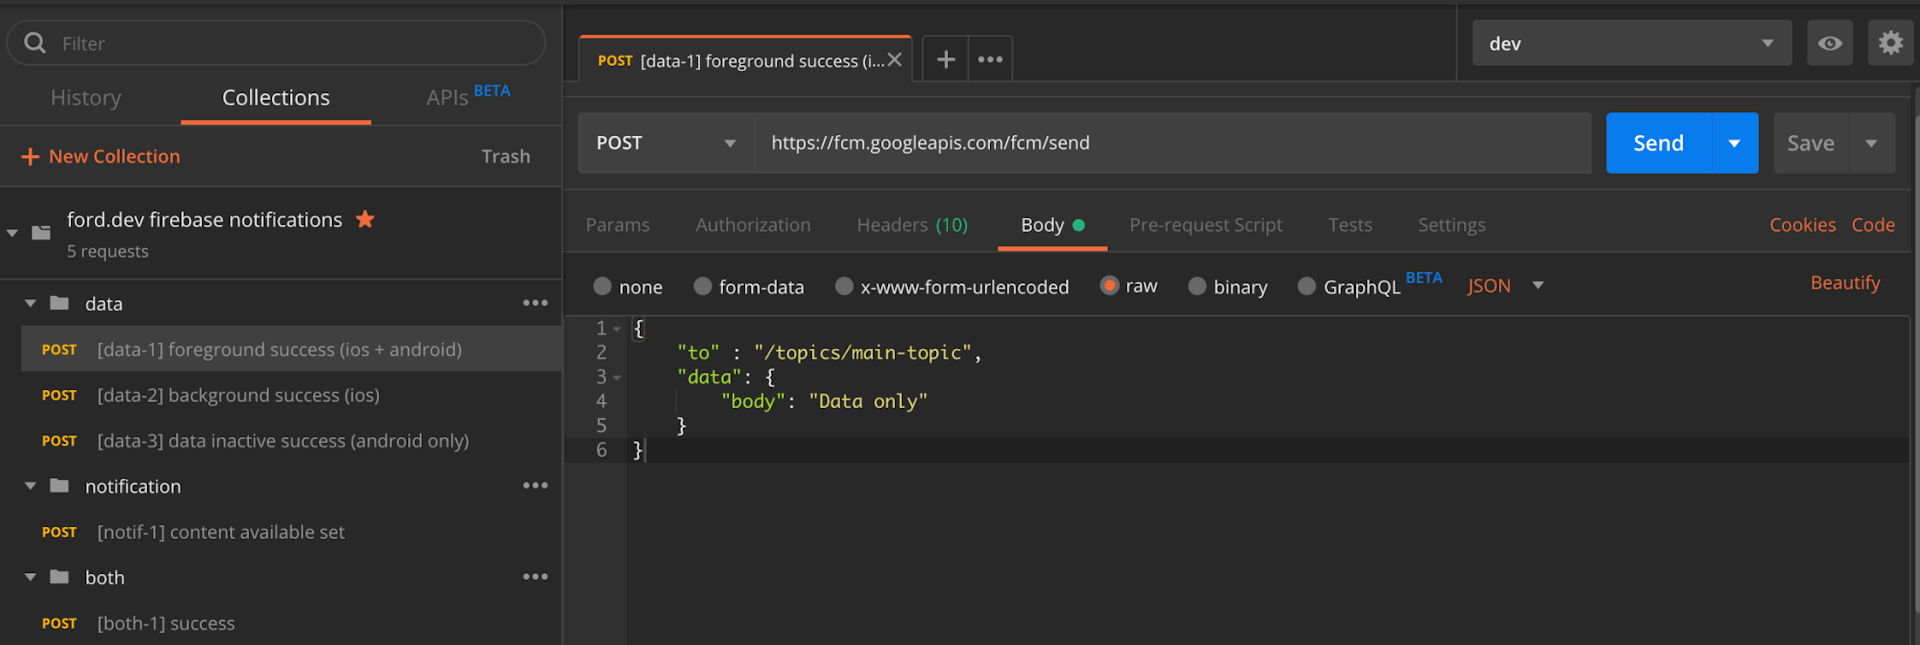

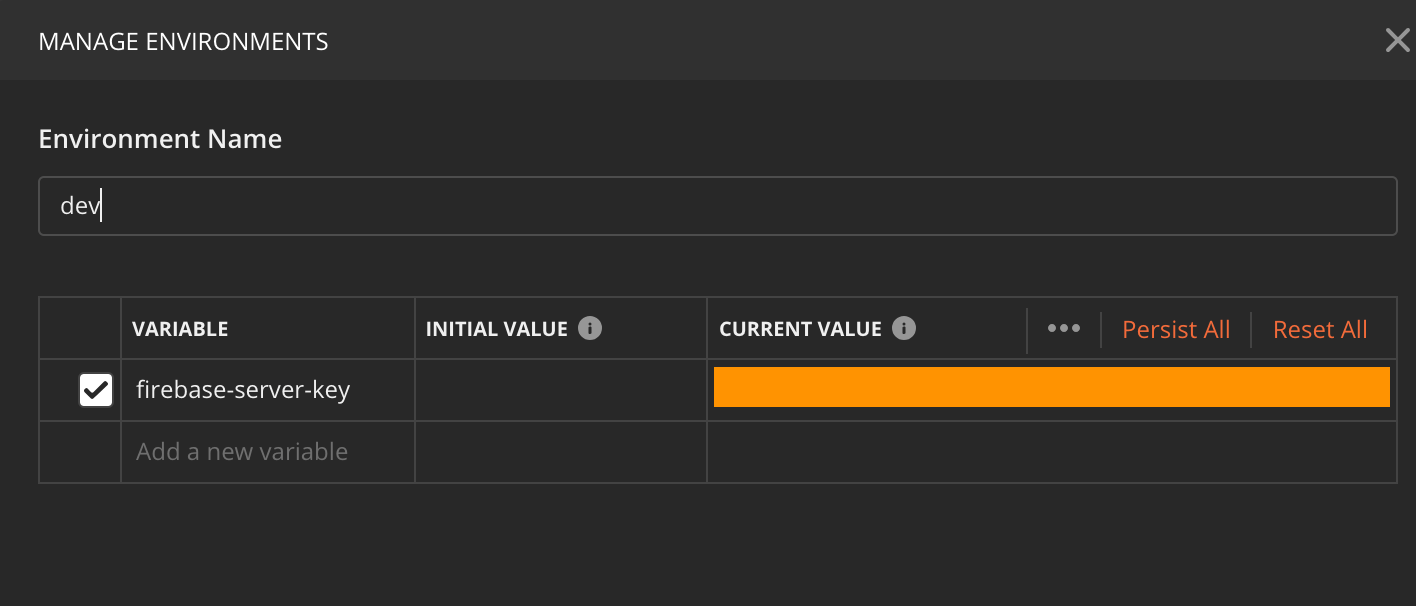
To help with sending remote notifications 📨, just add your firebase server key as an environment variable, and you’re good to go, fire away!
Demo 🎮
I wanted to build a visual tool 🔧 that made it easy to debug push notifications and track a notification’s journey to help understand what’s going on.
The tool consists of a form 🧾 to send notifications from within the device. Ability to send different types of messages, and allows you to set a delay ⏱️.
Please note ✍️ that the ‘Now’ option calls ‘displayNotification’ instantly. This is because it’s not possible to schedule a local notification without a time delay.
Below the form, is an activity feed of scheduled and delivered notifications with the ability to sort by ‘Date sent’.
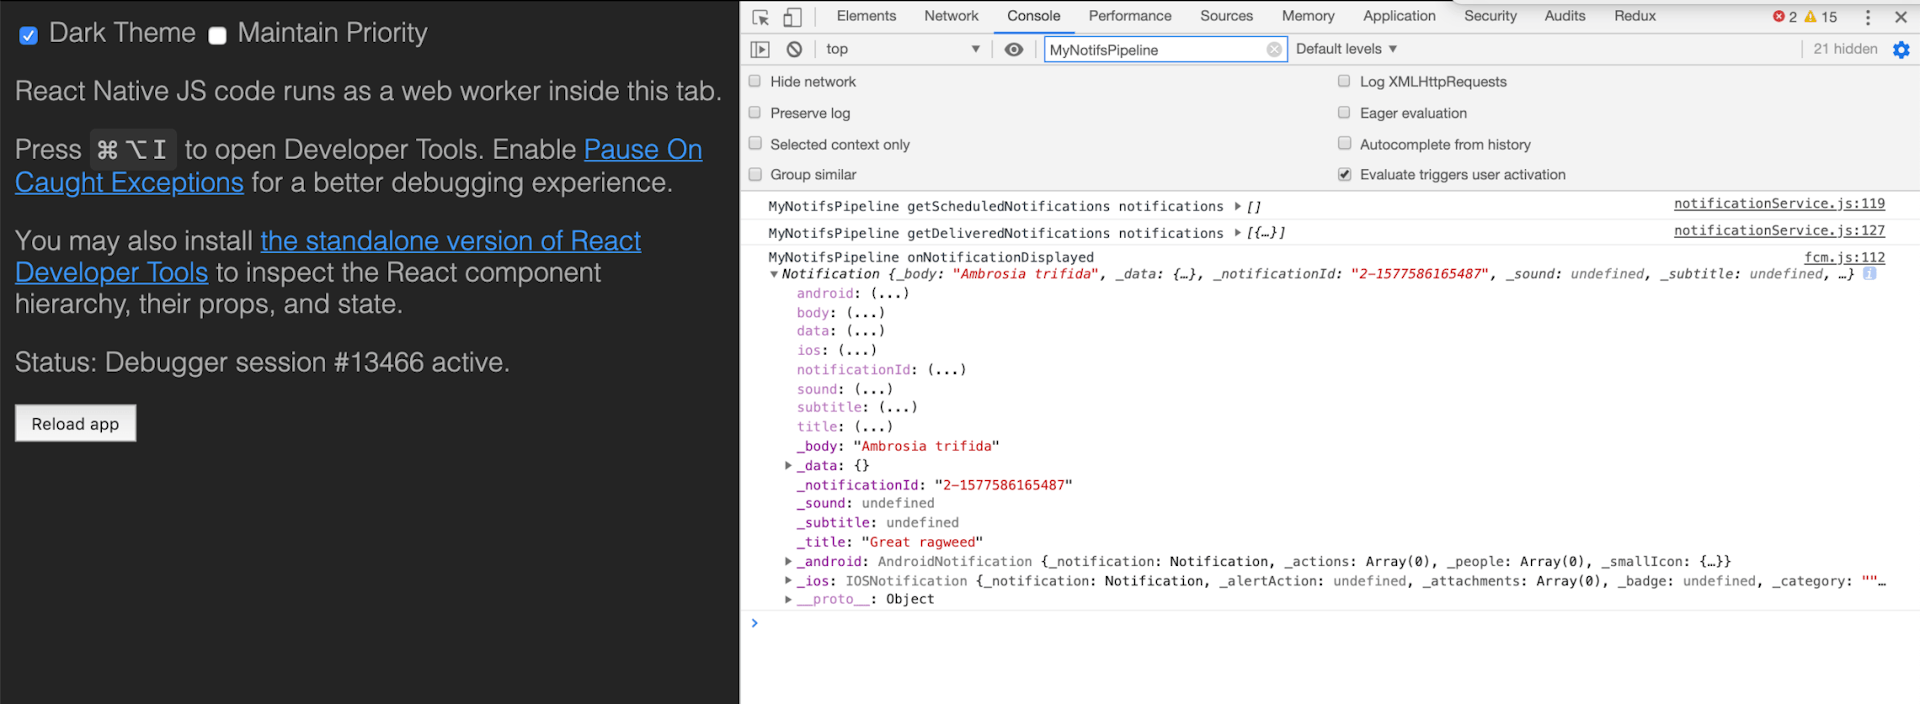
Each notification will have a log consisting of functions or listeners that were called/triggered. To see the payload in full, there is an inspect icon that will print 🖨️ to the console.

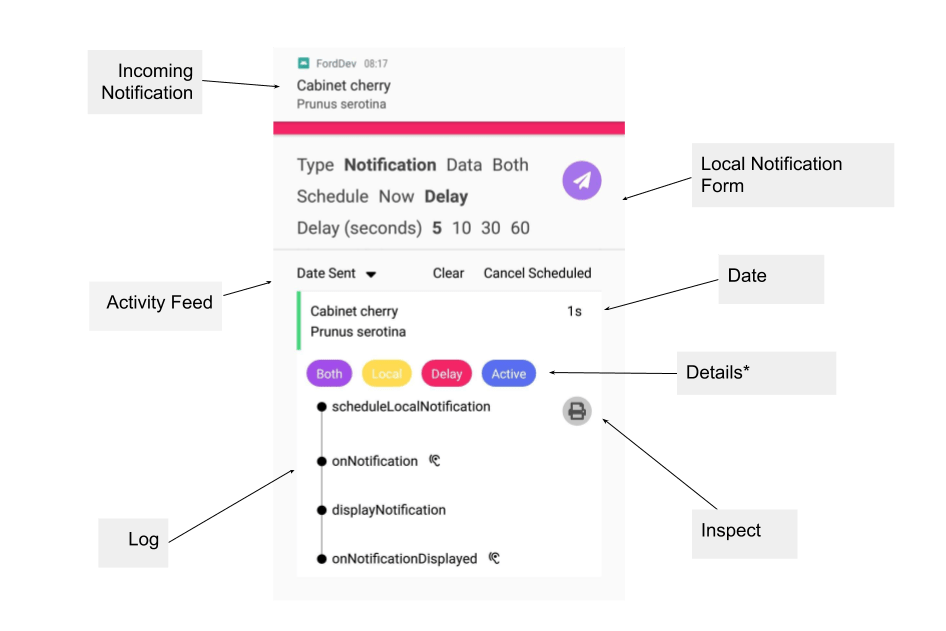
Details
- Message Type: Data/Notification/Both
- Sent From: Local/Remote
- When: Now/Delay (applies to local notifications).
- AppState: (iOS) Active/Background/Inactive, (Android) Active/Background
All custom logs to help assist with debugging start with “MyNotifPipeline“.

Debugging 🕵️
- Compare your results with the checklist I put together for this tutorial. It covers every scenario.
- Initial blog post (part 1) to check configuration
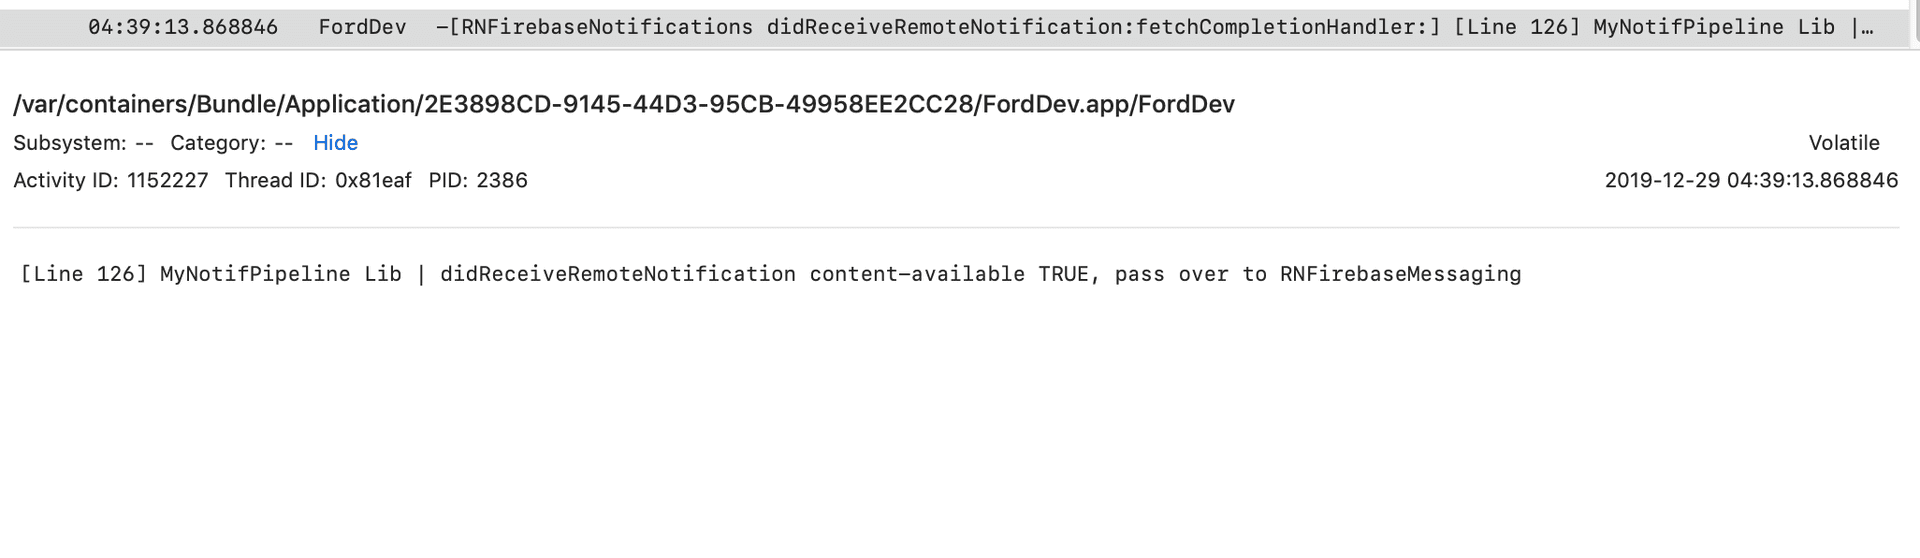
- View console logs (Device & App).

- Checkout Git Issues to RNFirebase. Someone else may have run into the same problem you’re experiencing.
- Reading documentation from the following: RNFirebase (Github/Website), Firebase, Apple & Android.
What’s Next
Hope you found this useful 🙏, feel free to download the code and use it as you wish. Please let me know your thoughts, or if you have a question comment below 🙋. Part 3 will go into more detail on styling, sounds, and maybe actions. I’m excited to see what the Invertase guys do next with push notifications, but in the meantime let me know if there’s a React Native library you’d like me to implement – it can be a different push notification library or something completely unrelated 💜.